Hardware Inserts In Other DAWs:
Every DAW handles patching and send effects differently. Many use dedicated plug-ins (such as Studio One, Logic Pro X) whereas others use hardware insert functionality that is configured centrally (Pro Tools, Cubase). Below are some instructions on how to achieve a similar explained in the video from your chosen DAW.
For a step by step guide on setting this up in Pro Tools, please follow the steps in the below SOS article:
https://www.soundonsound.com/techniques/pro-tools-integrating-outboard
Cubase
To insert outboard gear into your DAW session using Cubase, you will need to use the VST connections menu. This menu allows you to create a hardware insert and configure its IO paths, label the insert, and then place them into your DAW session in the same way as software plug-ins.
For a step by step guide on setting this up in Cubase, please follow the steps in the below video by Cubase help article:
How to Set up and Use External Effect Processors in Cubase | Q&A with Greg Ondo
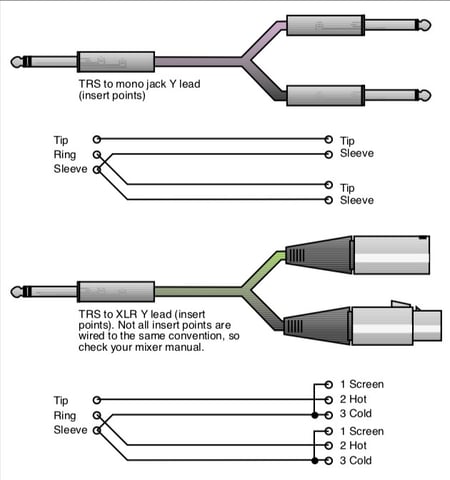
Insert/Y-Split Cable:
To connect external audio equipment into 500R8 via its Insert, you will need to use a standard Y-split or insert cable that splits a TRS jack into 2 separate connections - a send and return - to two mono ¼ jacks or male/female XLRs. The ‘Send’ connector (Tip + Sleeve) should be connected to the input of your outboard equipment and the ‘Return’ connector (Ring + Sleeve) should be connected to the output of your outboard equipment.
Here's a diagram showing how the insert cable should be wired: